
Are you looking for an easy beginners guide on how to start a blog in 2023. This step-by-step guide has all the information all in one place to help you start a successful blog (and make money from it in no time) even with the most basic computer and writing skills.
So buckle up with your tea in hand, this is going to be a long read!
Disclaimer – This post may contain affiliate links, meaning we receive a small commission when you make a purchase through one of our links.
You’ve got great ideas to share with the world and have decided to take the leap of faith and start your own blog. Let me be the first to congratulate you!
You’ve just landed on the ultimate guide to help you on your way to creating a successful and profitable blog!
Now, I don’t want to burst your bubble or put you off before you’ve even started but, you’ve got a long journey ahead of you.
With all the information out there it can seem pretty daunting and overwhelming!
I’ve been there before and it wasn’t the best of times.
That’s why I created this comprehensive guide, gathering all the information, resources and tools all in one place.
Who am I to tell you how to start a money making blog?
Well, after 5 years of blogging (and struggling) I finally cracked the whole “money making blog” code.
Most of my old pieces of content (which I’ve now deleted) were awful, they had little value, absolutely no substance and made me a total of … NOTHING!
Through all my trails, errors and learning I’ve officially come out the other end and that’s what I want for you. A quicker and effective way to start now so you can fully focus on creating money making content and follow your passion and dreams.
How this guide will help you start a blog and make money from it in 2023
• It will save you a lot of the time, effort and stress it took me to get to where I’m at now (living a life on my own terms!)
• You’ll have the perfect foundation to get your blog up and running in no time.
• You can start earning money from the get go. It won’t make you rich overnight but this guide will help you in the right direction!
Please note this is a very long post
This is a very in-depth guide and there’s a lot to take in. Everything will make sense the more you read on so don’t worry if it seems a little confusing at first.
I’m going to take you through EVERYTHING so you may want to get yourself comfortable and bookmark/save this post for reference.
I promise everything you learn here has a heap load of value and will be your one way ticket to starting a blog and making money from it.
I want you to create the life and freedom you deserve all whilst doing something you love, so stick with it till the end.
If you’re ready to commit and apply, you’re in the RIGHT place.
Without further a do, let’s get your blog journey started!
So first, let’s iron out a few things.

Is it worth starting a blog in 2023?
YES! I can’t stress this enough. Blogs are still popular and relevant today and will be many years down the line. With the right strategies and tools they can be extremely convenient and profitable infront of the right audience.
Here are a few reasons why should start a blog
1. You own your blog
Unlike social media sites who own your content, your blog is yours and you run the show. A blog is so much more stable and reliable making it perfect to create an income from. A social media account is too unpredictable and It’s just not worth the headache.
2. Blogs are still relevant
Chances are you’ve googled something recently and gotten tons of results and many of them are … BLOGS! People are always looking for something and your blog could have just the answers they’re looking for.
2. Content lives longer
Things live longer on the internet and in terms of blog content they can last a lifetime! Each piece of content has the potential to be read time and time again and what does that lead to?Generating passive income on autopilot!
Blogging isn't easy but it's worth it!
I’m going to be totally transparent with you. Making money blogging is possible but it isn’t easy (especially in the beginning). It’s not a get rich QUICK scheme so don’t come into it with high expectations straight away.
Yes, some people make money much quicker than others but it takes a certain level of commitment to get there.
So with a little hard work, patience, perseverance and the willingness to learn it can reward you beyond your wildest dreams!
Mindset is everything
Let me tell you this now so it’s not a shock later.
If you don’t come into this with the right mindset from the get go, you will have an even tougher journey ahead of you.
I’m not going to sugar coat anything, you will have moments of self doubt, fears and a total lack of motivation. ‘Can I really do this?’, ‘Am I good enough?’, ‘But I’m not qualified’. You have to find a way to block out the noise.
The thing is, anyone can start a blog but not everyone succeeds or sticks to it. They’re just not prepared for everything that comes with it.
That’s why this guide will outline everything you need to know and do so you can decide if you’re ready to take it on.

CHAPTER ONE
How to set up your blog
1. Choose your niche
Your niche is what you will be putting out into the world; what you’ll be basing your content around. Choose something you’re passionate and interested about that will be profitable.
Profitable doesn’t have to be a normal ‘profitable niche’, any niche can be monetised, so long as you can talk about it extensively.
Also, you don’t have to be an expert at it but you do need to learn and expand on it more and more as time goes by.
It’s best to pick one niche so you can offer consistency but if your multi-passionate about a few things it’s possible to broaden your niche. Many bloggers have created successful blogs doing this. You just need to connect and fuse them together to create an overall message.
For example: I blog about travel, wellness and selfcare with hints of lifestyle, but my main message is helping people to create a better life they deserve through these topics.
The bottom line is this: a successful blog should provide value that resonates with your readers and focuses on solving their problem(s).
2. Pick your domain (blog name)
Once you’ve got your niche sorted you can use that to build your blog name. Here are the kind of names you can choose:
• a name that is niche related.
• something that will tell the audience what your blog is about and what to expect.
• or simply just choose your name.
Don’t stress if your blog name isn’t blatantly obvious. Once you build your brand correctly this won’t matter much.
When picking your domain:
• Go for a .com domain as it’s more universal and approachable.
• Don’t use special symbols like hyphens.
• make it easy to spell, remember and say.
• Check if the name is available by typing it in the web search tab or when you register your domain on Bluehost (which I’ll go over in more detail in a bit).
3. Get a self-hosted blogging platform
A blogging platform is a service that allows you to create, manage and publish your content online.
If you want to start a blog and make money from it you need a self-hosted blog. What does this mean? A blog that you pay for hosting rather than a free blog and as tempting as a free blog sounds you do not want to start a free one.
Here's why you need a self-hosted blog
• You own your blog and all the content on it and have more control over it.
• You will have more options and freedom to customise the look, design and functionality.
• They offer faster speeds and rank higher on Google.
• It looks more professional and trustworthy.
• You get more support with it.
• You can make money from it and monetise it: if this is your goal (which I’m sure it is) than a free blog will severely limit and restrict your earning potential. A self-hosted blog allows you to run ads, join affiliate programs and brands prefer them over a free blog.
WordPress is one the best blog builders
WordPress is the best, most trusted and most recommended website building platform. It powers over 40% of websites and provides limitless flexibility so you can make your blog as simple or as complex as you like!
Please note: WordPress.org is the self-hosted platform not WordPress.com.
They’re both free but you’ll need to install WordPress.org when you’ve chosen your host.
This can be really confusing but I’ll show you step by step how to set up the correct one via Bluehost in one click!
4. Get web hosting
A web host allows you to make your site accessible on the internet by acting as a “host”. They also keep your website files safe and secure.
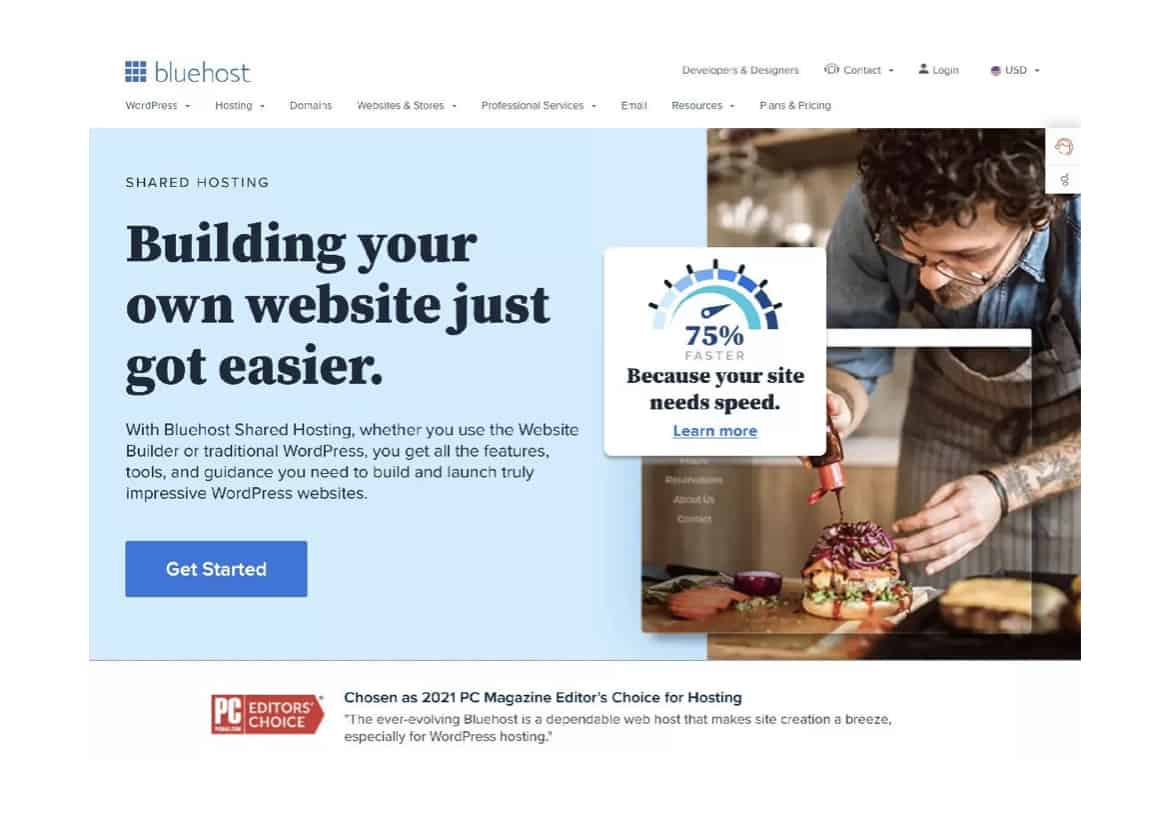
I personally use and highly recommend Bluehost for web hosting and here’s why:
• It’s the best web hosting company recommended by WordPress.
• It’s the most budget friendly hosting making it especially good for new bloggers.
• You get a free domain name when you buy a 12 month plan through my link.
• It offers an easy WordPress installation process.
With my link, for as little as $2.95 a month, you can start your blog with everything it needs on Bluehost in as quick as 15 minutes.
How to start a blog with Bluehost - let's get you set up!
1. Click here to go to Bluehost.
Click on the “get started” button (in some cases you may need to click on the “host your site” button first).
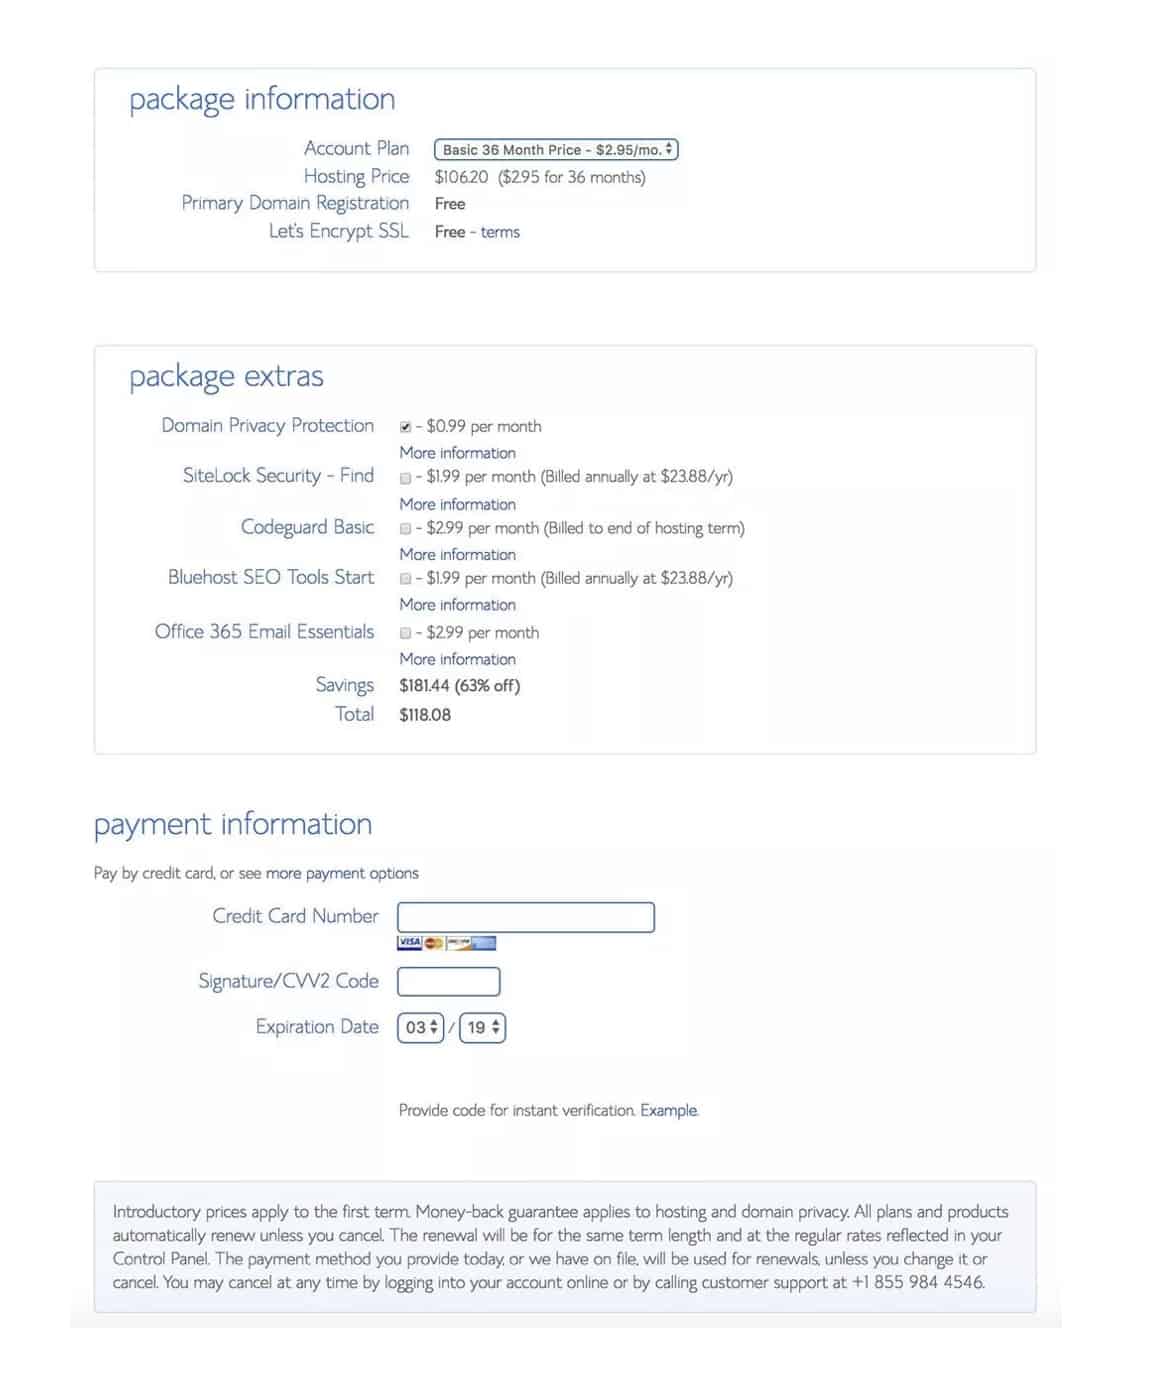
2. Choose the plan that suits your needs best.
To get started I suggest the “basic plan” but if you know you want to add more than one website, I suggest the “choice plan“. You can always upgrade or downgrade in the future.
You’ll need to also choose a 12 month or 36 month plan as there’s no monthly option. It might seem like a lot but it works out better this way as:
• you have peace of mind about a yearly renewable date over a monthly one.
• it works out cheaper annually.
• you need to give your blog atleast a year to make it successful so a monthly plan is pointless.

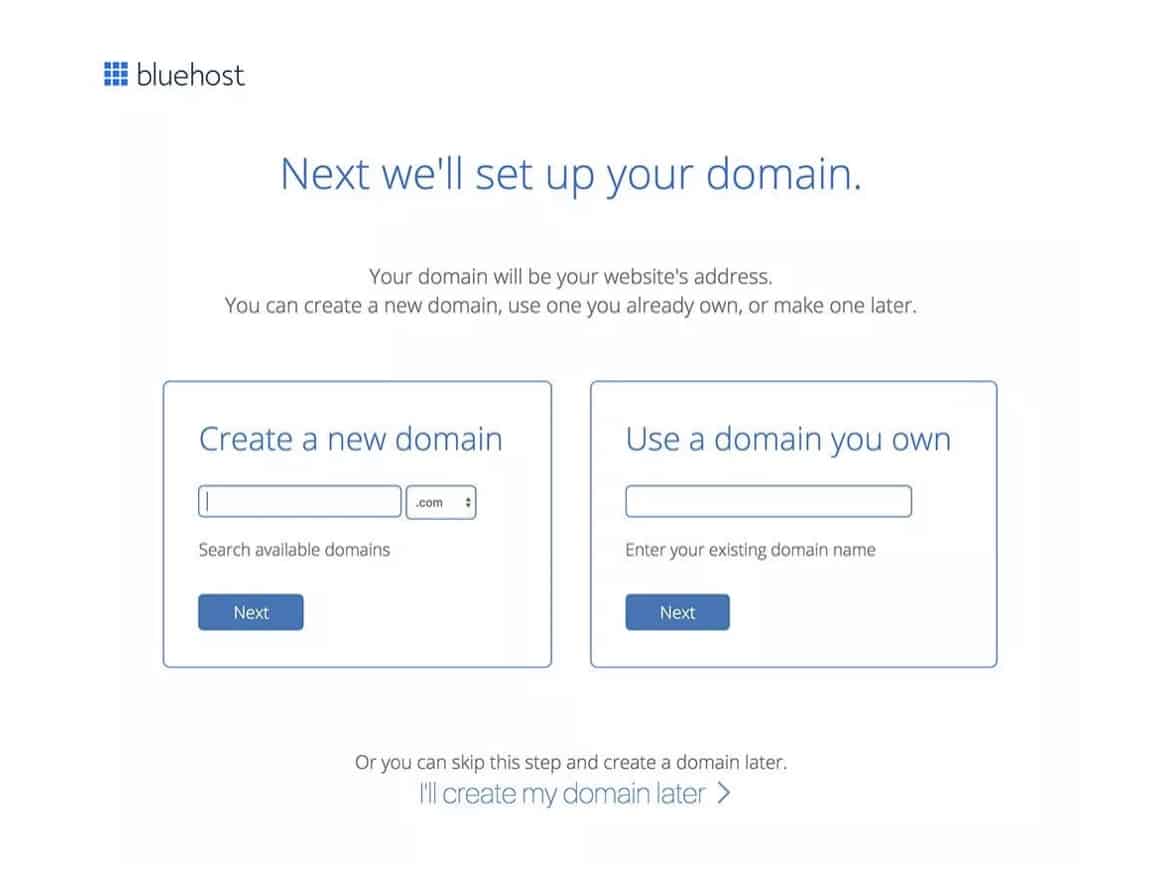
3. Set up your domain
For the first year you’ll get your domain for free. If you already have a domain you can add it here, if not, add a new domain (I put diaryofmyspirit).
If you’re still unsure on your domain name just skip this step and click on “I’ll create my domain later”.
4. Fill out your account information
Make sure to fill this out correctly and that all the information is up to date, especially your email address.
5. Select a package
The longer your plan the cheaper it will be. Add any extras you feel you’ll need, personally I didn’t add any.
6. Enter your payment details.
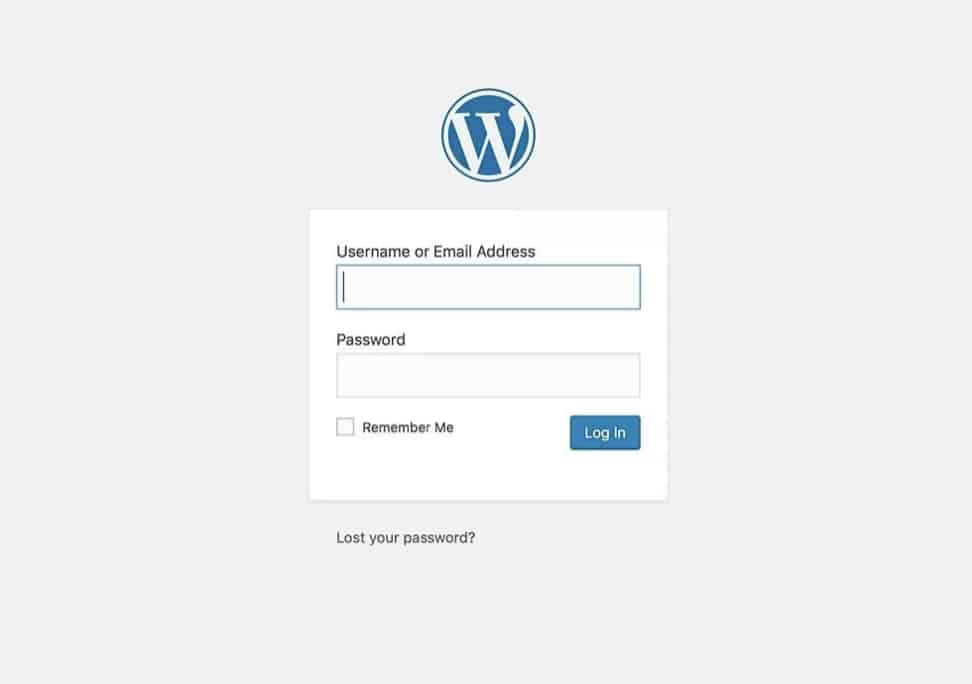
7. Install WordPress, create your password and log in.
Bluehost makes this super easy. Just click on install WordPress and let Bluehost work it’s magic! Create your password and you’re ready to log in.
And that’s it! You’re officially the proud owner of your very own website, woohoo!
Get to know your wordpress dashboard
Before you start stressing, your WordPress dashboard is going to look a little scary and intimidating at first. However, I promise you in a couple of weeks it will get easier to navigate and understand!
For now, just know that the menu on your left is your sole focus. Most of the tabs are pretty self explanatory and you’ll be able to figure out all the basics pretty quickly.
How to log in
Every time you want to access your blog’s back office or dashboard all you need to do is this:
Type in your domain name in your internets address bar and add /wp-login.php or /wp-admin to it and hit enter.
So like this:
www.yourwebsite.com/wp-admin
Next, put in your login details and you’re good to go!
5. Pick a premium theme
Now for the fun part, designing your website!
Once WordPress installs they may ask you to choose a theme. You can either skip this or choose a free one or install a premium theme (you can change your theme anytime).
Here’s the bottom line: free wordpress themes are not worth the time and effort you need to put into them to get your blog to look and work the way you want it to.
If you’re as serious about blogging as I think you are, I highly recommend investing in a premium WordPress theme.
• A good template theme will make your blog look more professional and determine your blog’s aesthetics and function. This is essential to capture your audiences attention.
• The easier your theme is on the eyes the more of an enjoyable experience your audience will have. Ultimately, they’ll end up staying on your page for longer.
• The good thing is, buying a theme is just a one time payment and for a one time investment to make your blog more appealing, it’s worth every penny!
The best premium WordPress theme
I highly recommend 17th Avenue Designs (the template I use for this blog!) Their range of templates are all effortlessly beautiful and perfect if you’re looking for a clean professional look.
The templates are a little more chic and on the feminine side but they can easily be customised for a more gender neutral blog look.
All their templates are easy and quick to install and they have an amazing customer support team should you need to contact them! You can read more about 17th Avenue Designs in my post here.
How to add your theme to your blog
Once you have your theme, you’ll need to follow the guidelines of where you brought them from.
Next you’ll want to add it to your blog. Log in to your WordPress dashboard and go to:
appearance > themes > add new
and select your theme. If you purchased your theme from 17th Avenue Designs or elsewhere, click on “upload theme” than choose your file and upload.
Activate and customise your theme
Be aware, initially, the theme will look nothing like the well put together template you saw when you purchased it. But with a little customisation you can make it look the way you want it to. 17th Avenue designs allows you to import the demo to make it easier to customise!
So head on over to appearance > customise and now you can play around with your navigation menu to start building your blogs design. You’ll be able to see a live preview of all the changes you make as you’re making them!
6. Set up your blogs structure
Before you do anything else , you’ll need to set the structure for your blog.
Click on settings > general settings and configure the settings you want to use for your blog.
Change the permalink structure on your blog before you publish any posts.
Go to settings > permalinks and under common settings select “post name” and click on save changes.
It should look like this:
https://yourwebsite.com/sample-post/
This is the correct, universal and professional URL format your blog should have.
7. Install essential plugins
What exactly is a plugin?
In short, it’s a software that adds extra features and functionalities to your website. So you’ll want to start installing some as soon as possible to get your blog off on the right foot!
The great thing about WordPress is it gives you access to a heap load of plugins. The not so great thing is it can be difficult to pinpoint which ones you should have to start with.
Ofcorse I’ve got your back on this one too. I’ve crunched it down for you so you can add the essential basics first. As time goes by, you’ll find and familiarise yourself with other plugins you’ll want to install.
How to install a plugin:
Go to plugins > add new and search for the plugin.
Make sure you update your plugins regularly to get the most up to date version and delete plugins you no longer use or need.
Install these plugins to set your blog up for success from the get go
• Site kit by Google (for Google Analytics): as a serious blogger who wants to make money from blogging you’ll want to sign up to Google Analytics straight away. It measures all your stats from visitors, site and page views, SEO, popular pages and more.
You need all these stats to see how your website is performing, what needs improvement and what’s doing well so you can create more content around that.
You’ll also need it as proof to show brands for sponsorships and some ad companies to be accepted in their program.
Once you’ve downloaded Site kit by Google just connect it to your Google Analytics account.
• Yoast SEO: this free plugin helps you to optimise your blogs content so it can perform better and be easily found by search engines. Good SEO practices = more traffic and eyes on your blog.
• Akismet Anti-spam: you’ll want to protect your blog from spam because let’s be real, the internet is full of them. Akismet is one of the best anti-spam services available.
• WP Rocket: having a fast website will improve visitor experience and help you rank higher in Goggle. WP Rocket is one of the top leaders in caching your blog pages amongst other things to ensure your blog loads faster and smoother.
• WPForms: is a powerful drag and drop WordPress form builder that helps you create forms such as contact forms, online surveys, donation forms, payment forms and much more. Creating forms on WordPress can be hard work but WPForms makes is super easy in just a few clicks without the need to write any codes!
• Updraft Plus: sometimes things could go wrong due to technical glitches amongst other things and you could lose your content! That’s why you’ll want to install Updraft Plus as a back up plugin to save all your hard work. It’s a reliable software that could save you a lot of unnecessary heartache.
• Shortpixel: this plugin helps to compress and optimise your images without compromising image quality. This will allow you to save space and help your site load faster. Shortpixel offer 100 images a month for free but you can upgrade to one of their affordable packages if you need more.
8. Create your essential pages
You’re almost there! Your blog is starting to come together nicely and you can start writing soon but first, there are a few important pages you should write and set up if your serious about making money:
• About page
• Contact page
• Legal pages: privacy policy, terms and conditions and disclosure
Let’s dig a little deeper.
About page
Your about page should give people a little insight into who you are and the purpose of your blog. A lot of bloggers only introduce themselves. But you shouldn’t stop here.
Your readers want to know how you’ll help them and whether it’s worth them investing their time on your blog, so outline the reasons why they should!
How do you do this?
1. Tell them who you are and your story.
You want your readers to be able to connect and relate to your journey.
2. Why they should listen to you.
Let them know exactly how you’ll help them solve their problem and how you can inspire them. If you’ve achieved something that correlates with your topic tell them about it.
Example – if your blog is about gut health tell your readers how you managed yours and how it led to improving an illness or improving your life in the process.
3. Get your readers to take action.
Prompt them to subscribe to your newsletter or go through your posts. Link to a popular or extremely useful post to get them going!
You can check out my about me page for a better idea.
Contact page
This page doesn’t have to be fancy or full to the brim with details. However, you do need to take your readers somewhere where they contact you or connect with you more.
Remember, your contact page is where brands also find your details to contact you for sponsorships and collaborations so make sure to address them too.
You can add a form using WP Forms or simply write out your email address so they can contact you directly.
If you go through your messages regularly on social media you can even point them there too. Please note, this shouldn’t be your main form of contact as it’s not very professional but is a nice little way to gain new followers.
Legal pages
If you want your blog to comply with the law you MUST add a disclosure, privacy policy and terms and conditions. These don’t have to be separate pages, I have mines all on one page here.
Your blog will be collecting your readers information in the form of cookies and other settings so you are legally required to address this.
1. DISCLOSURE
This is to explain to your readers that you are not liable and can not be legally held responsible for the content you publish as they’re based on opinions or personal experience.
To put it simply, your disclosure protects you from lawsuits.
For example: If you talk about health, you must disclaim that you are not a health professional. Tell your readers that they should consult with a health professional and not rely on the information given in your blog but take it as a matter of opinion.
2. TERMS AND CONDITIONS
These are what governs your website and tells your readers what to expect and the terms they should follow when they’re on your website.
3. PRIVACY POLICY
This is a legal requirement that states how you gather, use and manage your readers personal information.
You can add a privacy policy page as well as see more information and help guides on creating one in WordPress.
Settings > Privacy – create a new page.

CHAPTER TWO
Build an email list
I contemplated whether to put this here or after content creating (chapter 3).
However, I feel you need to understand the power of email marketing and why you should start growing an email list straight away.
Don’t worry, like I said before, everything will make sense the more you read on, so stick with me!
I’m not going to lie to you. I put starting an email list on the back burner for a looooooong time (5 years to be precise!) and if I knew than what I know now, I’d have started it from the get go!
So here’s to saving you some precious time and potential money today!
What is an email list?
An email list is where readers (subscribers) have opted (subscribed) to receive further or extra content and communication from you.
These are people who have willingly given you their emails to hear more from you and that’s pretty great in itself!
Once you start getting people on your email list you have a direct passage of communication with them. And this is usually where you can place yourself infront of the RIGHT audience.
Why do you need an email list?
1. Emails are engaging
They are more personal and intimate (like a VIP service!). You can format your emails however you want to get closer to you readers. It doesn’t have to be strictly business, a personal story (or struggle) here and there can really build trust with your readers.
2. They are a direct passage of communication
Your emails are more likely to be seen and opened by your subscribers than content being seen by your social media followers as they have a longer life span “at the top”. The forever changing algorithm on social media means your posts end up right at the bottom of the pile or not shown at all on your followers home pages!
3. Email lists convert
Email lists have the highest conversion rate of any other platform. So if you’re emailing your list about a latest find, product or post, subscribers are more likely to interact, buy or read them.
4. Email lists build another layer of trust
Through the connection you build with your subscribers, you’re able to explore a deeper level of trust. Your readers see you for you and transparency is key to great performing emails (and content).
What to include in your emails
I know it seems like writing more content on top of your posts is a lot, but honestly with the right strategies and schedule, it’s a breeze!
The no.1 thing you have to always remember is to add value or purpose in some way. Your subscribers want to feel special and that’s the secret to keeping them on your list.
You can send your readers anything that you find beneficial to them and as often as you like.
With that said, don’t go overboard with it, you don’t want to seem spammy! That will have them unsubscribing quicker than they joined.
Just be consistent, keep it simple and be real (and honest!)
So here are some things you can include in your emails:
• latest blog posts.
• personal stories or an interesting experience that they can learn something from.
• Some form of inspiration they can make use of.
• exclusive freebies.
• ask them questions to build a relationship with them.
• any products or services you want to promote.
Pro tip: be careful not to sound too salesy. Keep it light by linking to a blog post with the product rather than a direct link to the product.
So, do you see now why it’s better to start an email list from the get go?
But hold on. ‘How do I even go about doing all this email business?’ I hear you say. Have no fear, I’ve got you covered (you should know this by now!)
Sign up to an email marketing service provider
First and foremost you need to sign up to an email marketing service provider.
They are the ones that will collect the email addresses and allow you to create and send your emails to your subscribers.
Flodesk is the best email marketing provider
I use and highly recommend Flodesk for all your email marketing needs and here’s why:
• Flodesk is extremely user friendly
• You can design intuitive and creative emails that look great on both mobile and desktop with their clean and simple drop and drag editor.
• They simplify every step of email marketing so you don’t have to get too technical.
• They also offer step by step guides and tutorials for assistance.
• You can create beautiful emails, newsletters and workflows (automated email sequences) that convert in minutes (literally!)
• Flodesk brings effortless practicality with all the same features as other providers but without all the fluff, clutter and confusion.
• Their site integration is smooth and hassle free: You can create all the optin/sign up forms on Flodesk and embed them straight into your website without using third party sign up form plugins.
• They have a fixed monthly price for unlimited use and unlimited subscribers.
As my readers, you can try Flodesk here free for 30 days and get 50% off for your first year if you decide to stay on with my link!
How to get people to sign up to your email list
If you’re lucky, people will sign up to your newsletter just because they like you and your content.
But you don’t want to miss out on subscribers because of a ‘maybe’ and some readers need a little push.
That’s where an incentive comes in.
You offer a valuable (and irresistible) freebie in exchange for their email address.
Here are just some examples:
• ‘how to’ guide
• mini ebook
• free course or webinar
• worksheet or workbook
• a printable checklist, template or planner
• an in-depth content upgrade (where you share more on the topic in the blog post)
How to use Flodesk
How to create an optin form (subscription box)
Your freebie is now live and it’s time to capture your email contacts to send your freebie to.
Once you login to Flodesk you’ll be able to create optins that you can strategically place throughout your blog.
Click on ‘forms‘ and pick the style you want and start customising it.
When your form is ready, you’ll get am embedded code to place in your theme header and another code you can add ANYWHERE on your blog. Don’t worry if you’re not a technical whizz, Flodesk walks you through it all.
How to create emails and a workflow in Flodesk
Now you need to create a series of emails to send to subscribers who’ve opted in to your freebie or any other optin form on your blog.
You should create atleast 3 emails as a “welcome” sequence. Don’t worry just follow the instructions on Flodesk, it’s really straightfoward!
• Email 1: If you’re offering a freebie, the first should preferably contain the link to it.
• Email 2: a little ‘thank you’ and introduction of yourself and what the readers can expect from your emails.
• Email 3: could be a little follow up email. eg – find out how they got on with their freebie or ask what they’d like to hear more of from you.
You can set these emails to be sent out automatically through a workflow and set the time frame. For example: email 1 to be sent out immediately, email 2 after 30 minutes and email 3 after 2 days.
Ofcorse, you can add further emails to your workflow, start a new workflow or create weekly newsletters. Whatever is it, make sure you pop up in your subscribers inbox once in a while! You can surprise your subscribers with another freebie or a useful piece of content that will serve some purpose to them.
Ideally at some point you’d have built enough trust with your subscribers to send ‘sales’ emails promoting something.
The bottom line is this: serve your audience before you sell to them; build and nurture a trusting relationship with them so when you do sell it comes across more genuine and not salesy!
And that my friend is why an email list is so crucial to your business!
How to keep your subscribers happy
You’ll have subscribers who ultimately unsubscribe and that’s okay, even top bloggers and brands get unsubscribed!
Just focus on quality over quantity!
It’s better to have 1,000 subscribers who take action than 10,000 who hardly do.
So here’s a few pointers to keep your subscribers happy and on your list:
• Be consistent – if you send an email once a week keep up with that schedule so your subscribers know what to expect (plus it looks more professional).
• Stick to topics your readers will find useful – it doesn’t have to be a strict niche topic but it should relate. For example – if your a wellness blogger you could promote/talk about a wellness retreat in Zanzibar. This is still wellness related but with the addition of travel.
• Get personal – it’s always nice to hear something that comes from the heart. So once in a while just share a piece of you or your life (especially if it’s niche related). This will build trust, a connection and show your ‘real’ side.
• Don’t bombard your subscribers – especially if your sending emails with little value or purpose. Don’t create just to create, this just comes across spammy!
• Engage with them – ask them questions to show you value their opinions and make them feel like their part of the community.
• Surprise them – every once in a while do something a little unexpected that will make them feel special! You can send them exclusive content, offers and freebies they wouldn’t get if they weren’t on the list.
• Don’t just sell – this is a major turn off! Like I said before, always provide value and serve your subscribers before selling to them. And remember, when you do sell, make sure it’s light and genuine.

CHAPTER THREE
How to create amazing quality content
Well it’s been a bit of a journey to get here, but with your foundation set to starting a money making blog, now you are ready to start writing content. Exciting stuff right?!
It’s time you learnt the ins and outs of writing blog posts that will translate, convert and keep your readers coming back for more.
Here’s the bottom line: content is king and you need to write the right type for the right audience.
How do you do this?
Through useful content filled with value and purpose that will help solve your readers problems. That’s literally it! It sounds simple (because it is) but initially finding that content and the right audience could be a little difficult.
But I’m here to help you figure this out so let’s get into it!
1. Establish your ideal audience
Don’t just write content that could appeal to everyone. Trying to please everyone will end up on you losing out on your ideal readers that are more likely to be loyal and buy from you in the future.
So keep these questions in mind when writing:
• who am I writing for?
• what is my reader looking for?
• how can I solve their problem?
• what could they benefit from?
• how can I offer extra value in addition to their problem? – this is a really good one as you’re going above and beyond which builds more authority, trust and value.
2. Build trust with your readers
Trust is key to any successful business. If you’re being real and genuine your readers are more likely to come back for more, subscribe to your emails and eventually buy from you.
So how do you do this?
1. Offer indepth, valuable and quality content that’s free. Your generosity won’t go unnoticed and people will also share your content with others.
2. Don’t just write to sell (that will come naturally) but write to genuinely help your audience solve their problems. Create clear and actionable advice that drives results. The first post might not get your readers to buy, but if it’s quality stuff it WILL get them to read more posts and the third could be the money maker!
3. Don’t be too forceful or salesy just be honest and real. If your post looks like one big ad your audience will notice and you’ll automatically lose their trust and attention. Keep your sales tactic light, natural and make sure the products are relevant.
And how do you do this?
• speak to your audience like a best friend who has their best interest at heart.
• tell your story (it doesn’t have to be long but enough to connect with your readers.
• offer step by step guides/tutorials.
• show before and after pictures where relevant.
• offer unbiased opinions when you can; both pros and cons.
3. Create with quality in mind
Don’t just create for the sake of it. Yes, having lots of posts is good but having quality posts is miles better.
I know it’s easy to fall into the pressure and habit to get a post up quickly so you can stay consistent but honestly, your audience deserves quality. So if that means posting on a Thursday instead of your usual Mondays than so be it.
Also, don’t start writing fluff for the sake of a longer post. 1000 words of quality information is better than 5000 words of nonsense.
A successful post isn’t about length it’s about what’s in it. Again, quality over quantity!
4. How to create quality content
Now that you’ve got a better idea of your audience and how to create content for them it’s time to … well, actually write!
1. Brainstorm ideas
1. Buzzsumo
Buzzsumo is a useful platform that helps you to find topics with the most social shares. High social shares = a popular topic = more people searching and looking for it. It’s a free platform but offers a limited amount of searches per day unless you upgrade.
2. Check out other blogs in your niche
Create a list of blogs and websites who are in the same/similar niche as you and look at what they’re doing.
Draw inspiration and learn from them so you can implement similar strategies and content to achieve (similar or more) success with your blog.
Top tip: check their most popular blog post(s) section. These posts are usually the most profitable or have received the most traffic.
Remember: you are just getting inspiration DON’T copy their content. Just put your own spin on it from the research you’ve uncovered!
2. Search for popular and relevant keywords
Now that you’ve done your research, write down topics that are relevant to your niche and can offer value to your readers.
Search for keywords around them that your readers are searching for. Google and Pinterest are a great way to utilise keywords.
Simply type your keywords in the search bars and see what comes up. This will give you a clearer idea of what people are looking for specifically.
You can also use Ubersuggest which is a keyword searching tool that helps to generate and suggest more SEO focused keywords.
3. Make your post titles irresistibly click-worthy
Your blog post title is key to getting that first click.
The title needs to offer hopes of a solution to the readers problem before they even read the full post. So, you need it to stand out and grab your readers attention enough to spark their curiosity.
How do you do this?
Make them powerful and keyword focused. Just make sure you deliver on your promise and your titles aren’t misleading or click-bait.
Post title ideas that convert the best
1. ‘HOW TO’ POST TITLES
These offer a more detailed and indepth solution taking the reader through a step by step journey to achieve results.
Be clever with these type of titles, it will make all the difference!
Here’s one example written multiple ways:
Example: ‘How to write a good blog post‘ this is pretty boring and won’t really spark curiosity. So try something like this instead:
‘How to write content that will receive tons of traffic and countless shares’
OR
‘How to blog like a boss by creating content your readers will keep coming back for’
See the difference? Which one would you be more likely to click on?
2. A NUMBER/LIST TITLES
These show the reader different ‘bite size’ solutions for their problem giving them various options that drive results.
Examples:
• ‘10 effortless ways to lose weight without starving yourself’
• ‘5 steps to achieving and maintaining your desired weight goal’
• ‘7 things to remember when you’re ready to kick start your healthy lifestyle’
3. GUIDES OR STEP BY STEP TITLES
• ‘The ultimate guide to …’
• ‘A step by step guide to …’
How to lock in that click!
Now I’m not a psychologist but I do know our brains work in fascinating ways and one word or phrase could make all the difference to something.
So here are three pretty cool ways to really spark curiosity from your readers and secure those clicks:
1. Use power words for extra effect:
• ‘9 shocking things that could be holding you back in your career’
• ‘5 mouth watering deserts that are sweet, healthy and guilt free’
2. Use questions to provoke curiosity:
• ‘Could a keto diet really be the answer to your weight-loss problem?’
• ‘Are superfoods really super or is it all just a fad?
3. Use strong emotions:
• ‘5 ways to lead a healthier lifestyle even if you have a busy schedule’
• How to get your kids to eat healthier even if they hate vegetables’
4. Pay attention to your introduction
Believe it or not, your introduction could make or break you and is more powerful than you realise!
These few little sentences are the foundation for your post so you need to set the right tone from the get go.
The earlier and quicker you can establish relevance (solutions to a problem) the more likely the reader will read on and ultimately share your post.
So always ask yourself this: ‘is the intro inspiring and evoking enough for the reader to read on?’ ‘If I was them, does it inspire me to read on?’
5. Use images where appropriate
Visuals are a great way to break up a post and allow you to connect and keep your readers interested.
Pro tip: name your images well and appropriately (think SEO!) in the alt text and title. Naming your images properly allow them to show up in relevant searches aswell as higher up in the ranking.
Remember, the more descriptive the better!
Example: If you have a specific pasta recipe and an image of it in your post you may want to name it something like ‘quick and easy 30 minute gluten free chicken and veggie pasta’.
Now, If someone is looking for any of those keywords, your picture would be more likely to show up or be seen on google images.
6. Use paragraphs often
Make sure to break up your paragraphs accordingly; don’t make them super long or blocky, your readers will get bored pretty quickly!
Here’s a few tips for good practice:
• make frequent paragraph breaks.
• use lots of subheadings to organise your content.
• use bullet points when listing instead of comas.
• style your text with bold, italic or CAPITALISED words and sentences for extra emphasis and to keep it more interesting.
A user friendly blog post allows the reader to navigate through it smoothly. So be sure to make your subheadings clear and bold so readers can find a specific section easily.
7. Use affiliate links over banners
As tempting as affiliate banners are, I tend to use more affiliate text links in my posts.
That’s not to say banners aren’t a good thing, but just don’t focus your post around these too much.
Why?
Unlike banners, affiliate text links look less spammy, more trustworthy, flow better with the text and ultimately tend to get more clicks!
8. End with an epic conclusion
Some bloggers don’t do this (I’ve been guilty of this in the past) as they find it unnecessary and just end up leaving the reader hanging.
However, a conclusion forms a better connection with your readers and can round up the post more effectively.
It’s also the BEST way to include a CTA (call to action) like these:
• ask them to ask you any questions or leave their thoughts in the comments.
• ask them to share the post if they found it useful.
• get them to sign up to your newsletter (with a tempting freebie).
• prompt them to read more by linking to another post of interest.
Okay, that’s the end of content creating. I know that was a lot to take in so thanks again for sticking by me!
Some things I mentioned like SEO and keywords might not make sense yet, but I’m about to go through all that.
Remember: good content comes with good practice and once you’ve got the hang of it you’ll naturally fall into a rhythm that works best for you, your blog and your readers.

CHAPTER FOUR
How to drive traffic to your blog
Now that you have read worthy clickable content you need to get as much eyes on it as possible if you want to make money from it.
In this chapter I’ll be focusing on how to get targeted organic traffic from Google with SEO and utilising Pinterest practices.
Please note: everything I’ve spoken about so far ties together nicely to help increase your SEO standing already, but now it’s time to delve a little deeper!
How to drive traffic to your blog with SEO
SEO stands for search engine optimisation and boils down to what techniques you need to apply to your blog (posts) to get organic traffic from search engines like Google.
In the beginning, SEO can be a little time consuming and difficult to get your head around. A lot of bloggers, myself included, can get a little overwhelmed and stuck here.
I’m going to be totally transparent with you. I”m no genius at SEO but I’m learning more and more as I go along and I know enough basics to help you get off on the right foot!
1. Make Google your top priority!
With billions of searches per day worldwide , Google easily takes the spot as the best search engine. Landing your post on the first page of Google can completely explode your traffic and exposure.
But it’s not easy.
Quite frankly, it takes time to build your authority to get there. But with patience, the correct practices and perseverance it’s not impossible!
So why is Google traffic so essential?
• It is highly targeted: readers are searching because they need a solution to their problem!
• It’s very passive with low maintenance once you rank high enough. Google already knows your post is worthy of being seen and wants to keep it higher in the searches to keep their searchers happy!
But don’t get disheartened if you’re not on the number 1 page (yet)!
The bottom line is this: creating quality posts that you improve on and update frequently can still get you a good amount of focused traffic from Google. Eventually, it will get you on that first page!
2. Pay close attention to your keywords
Keywords are EVERYTHING, especially long-tail keywords. These are longer and more specific keyword phrases (usually 4 or more words) that are more likely to drive extremely targeted traffic and rank you higher much faster and easier.
Example: your topic is ‘the best herbs to improve your health’ – try niching down further to target your ideal reader: ‘the best herbs that act as a natural pain killer for chronic pain’.
Like I mentioned before, you don’t want to target just anyone, you want to get your post infront of the RIGHT audience.
The right audience = more likely chance to sell to them.
So from this example, the reader who Is looking for a natural pain killer or who suffers from chronic pain would find this topic much more useful and enticing.
Pro tip: make sure your URL is also SEO friendly by pulling out those all important keywords.
So for the example above, if the keywords are ‘herbs for chronic pain’, your URL will look like this: www.yourwebsite.com/herbs-for-chronic-pain
And remember: use these keywords throughout your post, including headings, subheadings and alt text/titles for any images you have.
How to find the best keywords for your niche
1. Type your keywords into Google and check out the first page
The posts there are ranked there for that keyword for a reason. So research those posts to form an idea on how you could make yours better in the hopes of outranking them.
Check out these posts DA (domain authority) with the free platform Moz toolbar. The DA predicts a websites success at ranking in search engines and the higher (upto 100) the better.
However, you’ll want to target the lower ranking DA’s as they’ll be easier to outrank. You could definitely aim for the higher ones but they’ll be a little more difficult especially when you’re just starting out with blogging.
2. Check out platforms like Quora, Reddit and Answer The Public
See what kind of questions people are asking around your niche. Sometimes people post on these platforms because they haven’t quite found the answer they’re looking for on Google.
3. Use Ubersuggest
Ubersuggest is a free SEO tool that helps you find and generate new keyword ideas amongst other things! This article will help you get a better understanding of it.
3. Get backlinks to your blog
Backlinks are links from one website to another and they’ll help you increase your DA and build trust with Google, ultimately ranking you higher.
Guest posting is writing blog posts to be featured on other blogs that will link back to you (generating backlinks).
If you’re lucky, you’ll get other blogs/websites linking back to your content without you asking! But chances are you’ll have to make connections with them and ask for backlinks.
Try and reach out to sites that are relevant to your niche.
How guest posting/backlinks could really boost your blog
Imagine this: you’re a beauty blogger and Byrdie just linked back to your blog. AMAZING!
• They’re a well established website with a high DA.
• They have hundreds of thousands of readers per month (more traffic for you!)
• You’re niche is the same (targeted traffic).
• Google now thinks your blog must be trustworthy and special to have received a backlink from a reputable website.
• Than … you guessed it! Google starts taking you a little more seriously and pays you more attention and starts to rank you higher!
And that my friend is the why backlinks can be a game changer for your blog!
How to drive traffic to your blog with Pinterest
I’m going to be completely straight up with you. I ignored Pinterest for years as I was too focused on trying to make Instagram work for me. BIG mistake!
I ended up missing out on tons of traffic and money on the table because I just didn’t understand how a platform full of pictures could help me make money!
Today, I’m here to tell you … IT CAN!
If you really want to start a blog and make money from it you NEED to get familiar and start promoting on Pinterest.
And here's why
• Pinterest is a visual search engine: It attracts millions of users every day who are searching for inspiration and answers. Users that can potentially land on your blog!
• Unlike social media platforms it’s not about follower count: you don’t have to spend time trying to grow a following (though that does help to an extent) but it will come naturally.
When you’re looking for tips and ideas you won’t care if someone has a million followers or a hundred and neither does Pinterest.
Instead, Pinterest uses its own algorithm to show pins according to search activity and interests, not according to follower count.
• You can start driving traffic straight away: unlike Google, you can start getting eyes on your blog from the get go. It may be a little slow at first, but with the right strategies you’ll get a steady stream in no time!
Here’s the bottom line: Pinterest is all about keywords so you need to create with SEO in mind. I’ll go through everything with you, so stick with me!
How to set up your Pinterest for success
Step 1: Create a business account
If you haven’t already got an account just sign up to Pinterest to get started. Once you’ve done this, convert it into a business account (it’s free).
Step 2: Add your name
Other than your own name or blog name, a good practice is to include your keywords too.
For example mines is: Fatima – Diary of my spirit | wellness + selfcare + travel
This now means your profile could show up if someone searches for those keywords; wellness, selfcare or travel.
Step 3: Have an effective bio
Tell people who you are and what you specialise in or could help them with. Doing this could also help to convert searchers into followers if they decide to click on your profile after seeing one of your pins. Make sure you get your keywords in here too.
Here’s an example of my name and bio:

Step 4: Have an image of yourself
This will help make your page more personal. But don’t dwell on this too much, if you don’t want to show yourself it won’t effect your traffic!
Step 5: Add and claim your website
This will verify to Pinterest that you ARE the owner of your website. Claiming your website is pretty straightforward and will help you get useful analytics and other business tools.
Also, your name and profile photo will show up in every pin you’ve created even if it’s shared or pinned by someone else.
Step 6: Set up Rich Pins
Rich Pins provide extra information about your content than a normal pin giving your searcher more insight and increasing the chances of getting clicks.
If you scroll through the browse page on Pinterest and see pins with bold writing underneath, that’s a Rich pin, any titleless images are not.
When people click on your Rich pin, your image, name and follower count will show up (with a ‘follow’ button) aswell as the title of the pin in bold and the description. A normal pin will just say ‘uploaded by _’ with no further information.
Follow this guide to set up Rich Pins.
Step 7: Set up your boards (like a pro)
Your boards are a collection of your pins that fall under a certain category/topic.
Making your boards keyword optimised will help you get clicks in no time! However, this involves a little bit of keyword researching.
Begin with typing in a keyword in the search tab and add all the relevant suggested keywords that come up. Your boards should be filled with relevant, specific and detailed keywords.
For example: If your board is ‘vegan recipes’
The description could be: ‘the best and simple vegan recipes for breakfast, lunch and dinner. Delicious vegan snacks and deserts to satisfy your palate.’
Create as many boards as you need for every topic.
For example: you may also want a board named ‘vegan tips for beginners’ to offer tips rather than recipes. Doing this means that users can go to the specific board they actually need.
How to create eye-catching clickable pins
Now that everything is set up correctly, it’s time to get pinning! Your pins are what’s really going to GET those clicks and … more clicks = more traffic = more sales!
So here’s what you need to do.
Step 1: Sign up to Canva to create your designs
Canva is the perfect tool for creating beautiful professional graphics without the need to hire a pro!
They have millions of stock images, templates, colours, fonts and more to fully customise your pins exactly how you want them.
As I’ve mentioned before, It’s a free platform, however, I suggest upgrading to Canva Pro to unlock ALL the features for unlimited and unrestricted use.
This will also be the case when you’re creating other designs like; ebooks, printables, newsletters and so on.
You can try it out free for 30 days here and decide whether you’d like to upgrade after!
Step 2: Create a new design that fits the desired Pinterest pin dimensions
Select a new design and search up Pinterest on Canva, they’ll pull up the dimensions for you.
You can choose between 1000 x 1500 px or 1080 x 1920 px if you want them a little longer. I like to mix mines up, but which ever is fine!
Step 3: Choose a template or start customising from scratch
I usually choose a template as my framework for inspiration and build on that with my own fonts, images and colours.
Step 4: Add an image or background that’s relevant to the topic.
You can choose from millions of stock images or upload your own photos. Just remember, Pinterest is a visual platform and in some cases, it’s the images that drive the clicks!
Step 5: Make you font easy to read
Your pins will be competing against a sea of other relevant pins. So you need to make your titles catchy and bold.
Step 6: Make your titles irresistibly click worthy
Here are some good examples:
• How to _ in less than _ days!
• Do you struggle with _? Than you should try this.
• Life changing ways to _
• Why you need to change/swap your _ for _
Step 7: Include your website on your pin
This will direct people to your blog If they’re pinned to another website and also stop people from stealing and claiming them as theirs.
Step 8: Use relevant keywords for your pins description
Pinterest can’t see your pin so you need to tell it what your pin’s about so they can show it in the most relevant searches.
Here’s an example of a pin I created that follows through all these steps:

How to pin on Pinterest to really get those views!
Now that you know how to create epic pins it’s time to start pinning.
But first, you need to know the secret to organic traffic and how to gain Pinterests trust and attention.
PIN DAILY!
Yes, you heard right!
Pinterest loves active users and fresh pins.
I know pinning daily sounds like a hassle but I’ll show you a tactic that will make it easier and plus Pinterest will reward you generously!
So how many pins should you pin daily?
2 – 4 pins would be ideal, spread out at different times during the day including a mixture of pins for a new post and pins for an old post.
For example – since I aim to post content weekly on my blog. I’d pin 2 fresh pins for my new post and 2 fresh pins for 2 old posts every day, Monday – Sunday.
Than, the following Monday, I should have a new blog post up and I’d choose another 2 old posts and start the pinning cycle again.
How to create so many pins without exhausting yourself
According to my pinning schedule, that’s 28 fresh pins I need to create every single week!
And it sounds extremely time consuming but I spend a total of 30 minutes only every Sunday doing this (sometimes even less).
And here’s the trick – batch create your pins by recycling the pins you’ve already made on Canva. All you need to do is any of the following:
• change the title and or font
• replace with different pictures
• change the colour scheme
28 pins doesn’t seem that much like a burden anymore right?
Here’s an example of 2 pins I created in less than a minute. I changed the picture, title and colour:


Also remember: You want to show variety in your boards and show Pinterest that you’re using the platform properly. So spend 5-10 minutes a day pinning other users pins to your boards, not just your own.
Use an auto-scheduling app for pinning
Here’s the thing, Pinterest doesn’t care how you pin, so long as you’re pinning and providing value to the platform. That’s where Tailwind comes in.
Tailwind is a Pinterest approved all in one easy to use social (media) auto schedular.
The more pins you post the more traffic and growth you’ll see. That’s not to say you should pin 40 a day, that’ll look spammy and you could earn yourself a little ban.
Just pin enough to be active and get Pinterest to take notice of you.
With Tailwind they take the stress out of manual pinning and do all the heavy grafting for you. They analyse your account and help you to pin point the best times to pin and at different intervals so your activity is more natural and high converting.
You can try Tailwind here on a free lifetime plan or upgrade for more tools to really grow your Pinterest and social media game!

CHAPTER FIVE
How to make money blogging
I know it seems like I went on a bit with tons of information but that’s only so you have everything set up ready to bring in THE MONEY!
Now the whole point of blogging (aside from the passion and helping others) is to make money from it!
Why would you do it for free, when in reality you can start a blog and make money from it all whilst doing what you love. It’s a win win!
Before doubt start setting in – you don’t need a degree or be an expert to make money blogging. But what you do need is patience, pure determination, dedication and a ‘can-do’ attitude (along with great content).
So what are the ways you can make money blogging?
• Affiliate marketing
• Display advertisements
• Sponsored blog posts
• Creating and selling digital products
• Offering your own services
Now let’s go through each one a little deeper.
1. Affiliate marketing
KEYWORDS
Affiliate program: these are individual programs the merchant (company) offer on their own affiliate platform and you need to apply separately for these. Just type the company name in google followed by ‘affiliate program‘ to see if they have one.
Affiliate networks: some companies use a third party service where they list their affiliate programs and the network handles and manages them on their behalf.
Cookie: unique data that is placed in the users browser.
Affiliate marketing is possibly the best, easiest, fastest and most common way to start a blog and make money from it especially if you’re a new blogger.
You can start monetising and earning straight away no matter how many readers you have.
What is affiliate marketing?
Essentially you recommend/mention a product or service in your blog posts and earn a commission when someone clicks on your affiliate links to buy. It’s that simple!
How does it work?
• Join an affiliate program
• Once accepted you’ll be given your own unique tracking link.
• Create a relevant quality post and add the link in.
• The reader lands on your post and clicks on the link.
• A cookie will be attached to their browser.
• If the reader buys from that affiliate program within the cookie duration you earn a commission from the sale. Woohoo you’re making money!
Okay, let’s slow down, rewind and dig in a little deeper.
How to sign up to affiliate programs
Joining affiliate programs and networks is pretty simple and straightfoward.
Each program has their own requirements and getting accepted is pretty common.
However, there is a chance you can get rejected but you can always apply again at a later date once you’ve fulfilled these requirements.
To improve general acceptance:
• make sure your blog is self-hosted.
• have a live blog preferably with a quality theme.
• have a few published blog posts up already.
You can apply to any and as many affiliate programs as you like, BUT, as nice as it is to earn a ton of money make sure you:
• focus on programs that are closer to your niche so you’re more likely to convert them into sales with your target audience.
• promote products and services you use, love or genuinely believe will help your readers.
What are the best affiliate programs to join
• Amazon associates
Amazon is probably the first program most bloggers apply to. They’re a trusted company used by millions of people with a huge marketplace full of products in every niche.
They only have a 24 hour cookie duration, however, sales are still easier to make due to its popularity.
Example: If you just clicked on this laptop, the cookie is now live on your browser. Within 24 hours if you go back onto Amazon and purchase something (even if it’s not the product I recommended) I still earn a commission. Pretty cool huh?
These are some affiliate networks that you can join and apply to thousands of different affiliate programs.
• ShareAsale
• Impact
• Awin
• CJ Affiliates
• Partnershack
Things to keep in mind with affiliate marketing
1. Some programs have a minimum threshold payout. For example, you have to accumulate $60 to receive the payment.
2. Payments can be made anywhere between 15 days – 3 months. It all depends on the affiliate program.
3. Commission rates also vary. Some have very low rates (like Amazon) and some much higher.
4. Cookie durations amongst affiliate programs also vary anywhere from 24 hours, 30 days, 60 days or even a lifetime.
5. You’ll eventually sign up to lots of affiliate programs so it’s best to organise them by creating a spreadsheet to keep track of them and your earnings.
How to easily make money through affiliate marketing
• Create quality posts to build trust and entice your readers to buy. Add your affiliate text links and talk about the products naturally.
• Create honest product review posts. Including pros and cons sounds more genuine, builds trust and allows the reader to come to their own conclusions so you don’t sound too salesy.
• Write a monthly round up post (what I loved this month) or ‘favourites’ post. These still offer quality and they do sound more salesy but the readers are already aware of this due to the nature of the post so don’t worry!
• Create a shop or resource page like I’ve done here. These are really good at rounding up a whole bunch of products in one place.
• Do gift guide posts for special holidays such as mothers day, Christmas etc etc. These are great because around these periods people are ALWAYS looking for ideas on what to buy!
• Promote your affiliate links on Pinterest. However, some affiliate programs don’t like direct linking on Pinterest so make sure you read their policy carefully.
• Naturally add your affiliate links to your emails and newsletters if they’re relevant and will serve your email list well. But remember always serve them before you sell to them!
• Add your links to your social media accounts (Facebook, Instagram, Twitter, Youtube) especially on features like the ‘swipe up’ Instagram stories.
Remember what I said before: affiliate text links flow more naturally with the text so focus more on these than affiliate promotional banners.
IMPORTANT STEP
Make sure you ALWAYS disclose and make it clear on your blog posts that it contains affiliate links. It is a requirement by law.
The best practice is to add a disclosure at the beginning of every post (just like I have on this post) and also in your legal pages.
Here is a simple example you can use.
‘Disclosure: please note this post may contain affiliate links meaning I get a commission when you make a purchase through any of my links at no extra cost to you!’
2. Display advertisements (display ads)
Display ads are one of the easiest and low maintenance ways to start a blog and make money from it.
How display ads work
1. Sign up to an ad company.
2. Once accepted, they’ll display ads throughout your blog.
3. Depending on their set criteria, you earn money every time someone clicks on or buys from an ad (or just by it being displayed on you blog), however, clicks are the most common way.
How much can you earn through ads?
This varies on your niche, the ad service and the amount of traffic your blog receives. Essentially it comes down to CPC (cost per click) and CPM (cost per 1000 impressions) rates.
Here are some common ad networks you can apply to
• Google Adsense: for beginners or low traffic, Google Adsense is the easiest and best ad service to apply to with a higher chance of being accepted. They have no minimum page views requirements but unfortunately they do have a lower CPC and CPM rate.
• Mediavine: this is a great ad service that offers a much higher CPC and CPM rate. However, you’ll need 50,000 monthly sessions on your blog to apply and be accepted.
• Adthrive: just like Mediavine, Adthrive is an equally good ad service with high CPC and CPM rates. You’ll need 100,000 monthly page views to be accepted.
I suggest starting with Google Adsense and once your page views are high enough to apply to either Mediavine or Adthrive. Earning potentials with these two ads are quite similar so it really comes down to which you prefer.
3. Sponsored posts
A sponsored post is where you work with a brand/company for an agreed fee in exchange for a blog post or/and a product feature on you social media platforms.
How much can you earn with sponsored posts?
This really depends on a few factors and coming to a reasonable agreement between you and the brand.
Negotiate a fee with the brand according to your traffic, follower count, email list subscribers, niche and the amount of work and time it takes to produce the content.
Please note: even with a small following you can reach out and pitch to brands. Some brands are more keen to work with micro-influencers as their followers (and traffic) tend to be more loyal and targeted.
Also note: sponsored posts are a little more high maintenance as you’ll need to create valuable satisfactory content around the product/service. Unless it’s a long-term collaboration with the brand, you only get paid for it once.
How to pitch to brands for sponsorships and collaborations
I’m no expert and am yet to focus on sponsored posts so this is just a basic framework on how you could reach out and pitch to a brand.
1. Directly email them (the preferred and more professional approach) or contact them on social media.
2. Introduce yourself, what you do (niche), why and how you’d like to work with them.
3. If they sound keen, send them your media kit. This is a basic information kit about you, your brand and all your site and social media stats. There are loads of media kit templates on Canva which you can customise!
4. Always give the brand a chance to respond back to you before you start talking about your price and rates.
Please note: you will get rejected from time to time but don’t get disheartened! Most times brands will give you their reasons for this. I suggest you keep this response and email them again in the future once you fit their requirements better.
The number one thing I have to say is this: you’ve worked so hard on your blog and content so DO NOT SELL YOURSELF SHORT! If a brand is offering you less for your time, effort and worth, just leave them be.
4. Create and sell digital products
Selling a digital product is one of the best ways to earn a steady income! You can sell physical products but I prefer digital products as they’re less hassle and offer more freedom.
Why are digital products a great source of passive income?
• you create it once and set them to automatically be delivered to the buyer.
• once created, they’re low maintenance (unlike physical products).
• you set your own price and determine your own profit margin.
• with the right audience and promoting strategy, the earning potential is limitless.
Examples of digital products can you sell:
• printables: for eg. planners, journals, organising and tracking sheets.
• ebooks, guides, workbooks and worksheets
• graphical products: such as presets, templates and stock images.
• online courses/e-courses
• coaching programs and webinars
• memberships
The best platforms to create and sell your digital products
For creating products such as printables, ebooks and templates:
• CANVA: as I’ve mentioned (a little too much), Canva is THE place for creating and bringing your designs to life. The amount of tools, resources and templates they have make creating digital products an absolute breeze.
For online courses, coaching programs, webinars and memberships:
If you’re looking for something a little more indepth, online interactive products could be just the thing for you. So long as you have something of value people can learn from, you can teach and sell it to them.
There are loads of people willing to pay good money to learn especially if you make the delivery easy to digest and intuitive!
Where to create, market and sell these online interactive products:
1. Teachable: is one of the most popular learning platforms. They have simple course creation and management tools and easily customisable membership structures.
3. Thinkific: is the best course builder and is great for memberships focused on providing online courses. You can easily:
• build sales funnels
• create coupons for your customers
• bring your course to life with their simple drag and drop feature
• they also offer drip course content
3. Podia: is probably the most simplest platform to use as It’s a little less technical and hassle free than the other two. They are a great all in one building and selling platform for memberships, online courses and digital download.
Which ever you decide to use depends entirely on what would work best for your product!
5. Offer your own services
I’m not an expert at this one so I’ll keep it short and sweet!
If you have a valuable skill, utilise it and go freelance by offering and selling your services. So long as it can offer a solution to things people are struggling and want help with, its profitable!
Some services you can offer:
• writing
• graphical designer
• photography
• virtual assistance
• web developer
• social media management
• coaching
• proof reading
Before you think you have nothing to offer, remember, ANYTHING can be monetised with the right audience!

You made it to the end. It's time for you to start your blog and make it a success!
Trust me, If this fulltime mummy can do it … you can too!
Now it’s over to YOU!
It will take a little time, focus, hard work and patience but you now have ALL the resources, tools and tips in this guide to make your dreams a reality.
So start your blog today and get one step closer to creating the life and freedom blogging can give you.
Here's what you need to do in a nutshell
1. Start and set up your blog with Bluehost.
2. Get and install a premium WordPress theme.
3. Install all essential plugins.
4. Set up your blogs structure and add important pages.
5. Sign up to Canva for all your designs and creations.
6. Start building your email list with Flodesk for 50% off!
7. Sign up to Affiliate programs, an ad company or any other money making idea you have!
8. Write epic content!
7. Sign up to Pinterest and start pinning.
If you found this post useful or know anyone who wants to start a blog/website, I’d appreciate it if you could share this post!
Please don’t hesitate to email me or leave a comment below with your thoughts or any questions. I’d be happy to hear from ya!
Don’t forget to subscribe below and I’ll email you every time I have any useful blogging tips. And If you want to see more from me and my blog overall you can also subscribe to my newsletter belo
Thank you for sticking by me by reading this guide and for all your support.
YOU CAN DO THIS and I wish you all the best on your blogging journey!
Till next time!
Fatima x